In this short article I am going to cover the absolute easiest way to transfer files and folders in SharePoint, and also cover some tips as well that are related to the transfer of files in SharePoint.
So let’s get started. Please note that the instructions below are for SharePoint 2013/16, but should also be compatible with later releases of SharePoint 2019 and online as well.
The easiest way to move files and folders in SharePoint
If you have been using SharePoint for some point of time you will run into this problem with moving files in SharePoint.
Although it is super easy to copy and paste groups of files with drag and drop capability right into the browser you will notice it is a bit more difficult once you need to move an entire folder or a group of files and folders at once.
There is a much better way than doing each of these moves one at a time although you could do that it wouldn’t be recommended.

First, you need to start the Internet Explorer browser. The reason it needs to be internet explorer is that the other browsers such as Chrome, Firefox, or even Edge do not support this functionality.

Then you need to open the SharePoint library where the files and folders are stored in your site collection that you are wanting to move. Click on the library tab at the top of the page and you should find a new option that is enabled (If you are in Internet Explorer) that is named “Open With Explorer”.
Once you click this option it will then open up the SharePoint library in a traditional file and folder structure that will allow you to drag and drop, create new folders and files, copy, delete, or move files around in bulk within SharePoint.
Just something additional to remember is that when you transfer files from one SharePoint directory to another you need to double-check and ensure that both libraries have the same levels of the version control settings applied.
For instance, if you move from files from a directory will full version control enabled to a new library in SharePoint without any version control you can lose all the history in the transfer.
This is why it is so important to check this before moving folders or files in SharePoint to other locations. You don’t want to be in a situation where you are not able to regain your historical revisions of your documentation in the case you failed to double-check the library revision control settings.
However, as long as the settings match you will not have an issue and your revision history will be maintained in the move.
How to check your library version history settings
Go to your site collection or subsite within SharePoint and find the location of the library that your files are currently in currently.

Once you click on Library settings you will be presented with all of the options and settings for that particular library. You want to find the versioning settings of the source (where your files and folders currently are) library.
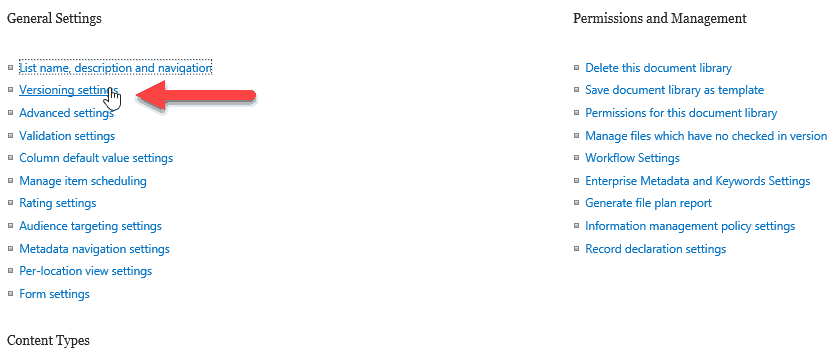
Next, you will need to review the versioning settings of the library, specifically if versioning is even turned on as well as if major and minor versions are allowed, and if check-in of content in the library is required.
Now you will want to additionally perform this check on the target library (where your files are going).
The settings should match in order to help ensure that copies of your major and minor versions will be supported in the library you are copying all your files into. If you find that they are different and do not match you need to reach out to the site owner and explain the situation and that versioning is required in order to maintain revision history.
What if you don’t want to maintain revision control history when copying files in SharePoint?
Then this is actually super easy as well, and most users do this by accident before they understand how to move files properly in SharePoint.
In the event that you actually do not want to maintain all the revisions of files when transferring them into a new location in SharePoint, you can just choose to copy the files which will only copy the most current revision of the files over into the new SharePoint target library.
The other way is that you could turn off all revision control settings on the target library which would only move the latest revision of the SharePoint document into the new target SharePoint library.
I moved my files and checked the revision control history settings and still don’t have version history. Why?
I usually see this happen when users choose to copy from the windows explorer screen and do not cut and paste the files.
In short when you copy and paste it places a “copy” of the file into a new directory (in this case SharePoint).
When you cut and then paste using the windows explorer option (as long as the document library revision control settings are the same) it will actually move the current document along with all the revision history as well into the new document library location.
A warning though is needed here. If you haven’t taken the time to check both document libraries it would be wise if you are working on a very large and important set of documents to take a good backup or a snapshot of your environment.
This is until you get the hang of moving files to and from SharePoint locations and properly transferring the file history metadata.
What do I do if I have an absolutely massive amount of files to move?
In the event that you have thousands or even hundreds of thousands of files to move you can still start with the same method using File Explorer. I have moved many files in this fashion although in many cases I cannot say it was the most speedy in the process.
In the event that the file transfer is so large or the number of files so great that you cannot transfer them simply within the windows explorer tool you can split up the moving or copying of files into separate tasks. But there are times when that may not even work.
As a last resort, you can use a custom 3rd party application to move the files along with the version history.
I have used ShareGate in the past for this exact purpose to transfer hundreds of thousands of files from Legacy SharePoint deployments into a newer release when the PowerShell Site Collection granular backups failed.
Hopefully, you will not need to go there, but just an option I thought I would throw out just in case.