In this brief article we will tackle one of the most common questions that will come up when managing your Microsoft Dynamics CRM deployment and that is how do I enable the tracing feature in CRM? You enable tracing through the servers registry, where have the front-end deployed to.
What server is my front-end web server?
The front end web server is the server typically that you are going to when you load CRM at your organization.
For example if you visit CRM primarily through a web client it will be the name of the server after the https:// or http:// .
Although not always the case, but most likely this will give you the name of your front end server which is hosting the CRM application on-premise. If you are in the cloud and hosting CRM through Microsoft you will not have access to update the registry directly.
There are some permissions, and other prerequisites for this process that you will need to know in order to accomplish enabling the tracing log successfully
- You will need the ability to remote into the CRM front end web server
- You will need administration access to the front end server so that you can not only view the system registry entries, but that you can also add new entries
- You will need to let users know that there could be downtime involved this is because the front-end server at least will need to be restarted in the process. If you can find an off-peak time to deploy these changes that would be best.
Enabling the Tracing capability for CRM On-Premise
This process works for just about every version of Dynamics CRM out there that is hosted on premise.
- If at all possible and especially if you are not familiar with the registry editor in windows you can take a system backup. When in doubt, make a backup first.
- Then, remote over to your CRM front end web server.
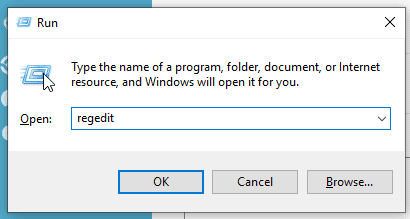
- Use Windows +R key, or click start and run to open the run menu after signing in. This will bring up a window like the one below.
possible.
- Navigate over the HKEY_LOCAL_MACHINE-> Software–> Microsoft–> MSCRM
- Right Click on MSCRM, click “New” and Select DWORD (32-bit) Value
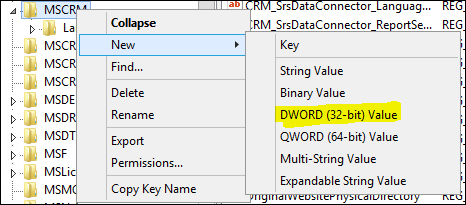
- Make sure that you name the new value exactly as TraceEnabled
This will by default be set to zero (0), which will leave the tracing option in the registry however it will not run the tracing on.
- In order to activate tracing the value of the entry must be set to a 1 like in the screenshot below.

Now that you have the value set and in place you will be ready to restart the server for the changes to take effect. So you will want to make sure that you can do this now and it will not interrupt any active users in the system so you should schedule this accordingly.
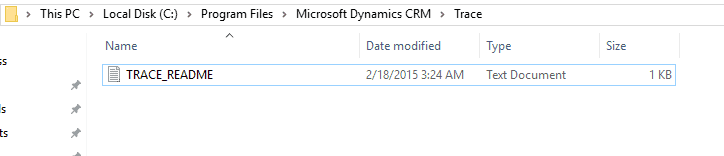
Where are the files stored once the tracing is enabled on the server?
The files in most cases are going to be on the front end server in the following directory.
How to Disable Tracing on the CRM Front End Server
To disable tracing once you find what you need you can just change the value of the entry in the system registry for TraceEnabled back to 0.
This is better practice than deleting the entry and having to recreate it later.
As you do more development you may come to really enjoy having this tracing in place.
Good luck with all your testing!